
Showing posts with label Kitties. Show all posts

Tuesday, February 28, 2012

Live in the Moment

My cats are a great joy in my life. Gidget has been really wanting attention this week. She loves to sleep on my chest or next to me and is always begging for her back to be scratched so I could not resist taking these pictures this morning.


Today, after reading Tim Holtz blog post, I decided I would spend my desk/crafting time working on a February tag for the 12 Tags of 2012. I was not sure I wanted to commit to a tag every month, but it's just one tag right? For most, that would be true, but being that I am unsure day to day if I can craft or set at my desk, then it becomes more challenging for me. So, I saw all of the tags posted on Tim's blog and was truly inspired. Wonderful tags, all so pretty, I wanted to play with my Tim products. Now, I do not have all of the products he used in his example, but I tried to use as many Tim products as possible. So, I hope you enjoy the pictures below.


The tag is a #8 sized tag that I made from watercolor paper. I clear embossed the tag first with the words and images. Then I colored the tag with Distress Ink Festive Berries. The edges of the tag was distressed with Tim Holtz distressing tool, then inked with Distress Ink Aged Mahogany. I then took a damp paper towel and wiped the embossed areas to clear off the ink. Then the tag was lightly sprayed with water to get a more distressed look.
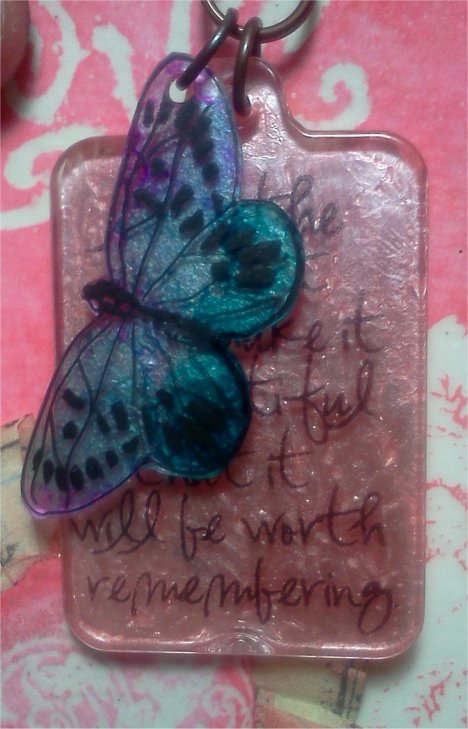
The fragment charm I pounced Liquid Pearl Pink on the back and stamped the saying in StazOn Black on the front. The butterfly was stamped with StazOn Black on the Ranger Shrink Plastic. Cut out, punched a hole in the wing and shrunk with my heat gun. I then colored the back with Alcohol Inks Stream & Wild Plum. I then dabbed Liquid Pearl White over the Alcohol Inks. These are both attached with a Tim charm clip & jump rings to the ribbon.
The heart was cut from watercolor paper, stamped and clear embossed. Then I inked with Distress Ink Spun Sugar and edged with Festive Berries. I lightly spread Pink Stickles over the non-embossed areas on the heart. Another heart was cut from cardstock (any color you won't see it). I stuck Tim's Tissue Tape around the edge of the cardstock as Tim shows in his video. Due to tissue tape being sticky, I used my embossing buddy on the exposed part of the back of the tape. This takes care of the stickiness and lets the tissue tape stay fluffy. I rubbed some of the Festice Berries over the top of the tissue tape. I then attached the pink heart over the tissue tape heart and glued it to the tag.

The key and locket charms were really fun to make. I used one of the small keys from the grunge board elements and then the locket was hand drawn on watercolor paper and cut out. I colored both of these charms with Distress Ink Black Soot. Using a Versamark Pen I colored the entire top and dipped it in the UTEE Black. Both were heat embossed. I ended up covering both charms, front and back, with two layers of UTEE. Once cooled, I spread a thin layer of Platinum Stickles, then dabbed on Alcohol Ink Copper. I then re-heated the charms slightly to embed the stickles and copper ink in the black embossing. Both charms are attached to the tag with a charm clip, brad and jump rings. The hearts at the bottom of the tag were punched with a Martha Stewart Edge Punch on Tim Holtz paper and glued to the back of the tag.

I hope all the instruction is clear enough. If you have any questions about any of the process, please let me know. Until next time......Enjoy!

Friday, December 19, 2008

Time Flies.........


Okay, time flies when your having fun and not having fun, although in my case, mostly having fun. I had to stop by and post some new pics of our newest family member. Her name, well, it's a toss up at this point. We cannot decide, so I have been calling her Little Bit. Some of the most recent thoughts were Sugar, Sugarplum, Ivory, Snow, Snowflake, Snowball, Pinkie..... on and on it goes. Hopefully, soon we will make it definitive. But, for now she is Little Bit.


We found her on one of the coldest mornings of the year so far. It has been determined that someone dumped two little kittens out by our building. The all black kitten disappeared. Not sure what happened to him, but this little girl was under a vehicle, yelling with all she had. She was, at the most, 6 weeks old and been without food for 2 days. She finally came to the food that was offered. I had never heard a cat purr and eat at the same time. Of course, we monitored her food intake for 48 hours and then slowly introduced her to our horde. Needless to say, most of my sophisticated grown-ups did not want to be bothered by a rowdy youngster.


But, with minimal events of screaming, everyone is happy now.


Little Bit loves to help out with everything. She loves to watch my fingers move on the key board and watch the mouse run around on the screen. She watches TV with us, too. But, as any baby does, she gets worn out. Good thing is, she sleeps anywhere.


On a sad note, our beloved Max has passed away. He became ill and was gone in half a day. He was an old man, so we knew it was on the horizon, but it's still hard sometimes. Also, my aunt is under going lung cancer treatments. Please keep her and her family in your prayers.

I vow to be more regular with posting for all to read this next year. Also, with more craft projects, painting, etc. Have a wonderful Holiday Season and remember that Jesus is the reason for the season! Merry Christmas, Happy New Year!

Sunday, May 18, 2008

New Family Member & Tag Card

I want to introduce the newest member of our family, Missy. In an earlier post, I mentioned that she adopted us and she has. We are unsure how old she is or what she has gone through, but it has taken awhile for her to trust us completely. Missy was the one who came running into our house without a thought one day. Mom had been feeding her outside, in which she had taken over the feeding when a neighbor moved and couldn't take Missy along. Missy ran in, she stopped and looking befuddled, I know she thought, "How did I get in here!". So, back outside she went. This went on for awhile before last winter and then the temperature dropped. We could not let her stay outside in the cold we had this year. So, when she came in and was hanging out, she stayed. She seems to love it. She ran straight to my bed and slept for a week, curled on my comforter. She now sleeps with her buddy Tyke and Mom. She does occasionally go outside now, but doesn't want the door closed, so she pretty much stays in.


Today's project is a Tag Card. I made this out of a half of a legal sized envelope. The designer paper, cardstock, punches and stamps are from Stampin Up! This card was inspired by Maria Bell's tutorial. She does really great tutorials and always has get inspirations. Check out her blog sites if you get a chance.

Please let me know if you have any questions, they are always welcomed.......


Weekly Scripture Inspiration
"For we are God’s masterpiece. He has created us anew in Christ Jesus, so we can do the good things he planned for us long ago." Ephesians 2:10 (NLT)

Tuesday, February 5, 2008

Here Kitty, Kitty.......

I now have four, yes four, cats. My newest is Missy. She actually adopted us. We opened the door and she came running in. Needless to say we had kitty chaos for a little while. Tike and JB were protecting their home and Max, well, lets just say he runs from water bugs. She sized him up quickly. Hopefully, I will have pictures of my newest addition soon.

My old man, Max, now likes to sit on my chest at odd times, while I paint, blog and eat usually. I actually had to fight to eat my pizza and hamburger forget it. You would think I don't feed him. Also, open any fish can and you will be lucky to survive. He wants to believe that he is King, but really he is just a drama queen. His favorite past time is chasing JB, because JB runs from him, which in turns gets Tike to chase Max and fight ensues. Most of the time, we live in peace, but if Max is on a tantrum...everyone watch out. He loves to kiss up to the others and then turn and smack them on the head. Sneaky one he is.


Tike is my enforcer and protects his brother JB. JB never did see well from the time he was born, so this is a good thing. JB can jump though. He judges the area twice and then clears it. The highest I have seen is 5 feet 6 inches. I took them as a package deal, which I would do again in a heartbeat. They are my beautiful boys. Tyke has now taken to protecting Missy, so all is well on the home front and everyone, in this minute, is living peacefully.


Hope you enjoy today's project. The happiness card is made from paper towel art. I used Stampin' Up stamps for the images. I have two different cards pictured. The stamped images are pretty much the same, but the paper towel background will never be the same. Even if you use the same colors, I have never gotten the same results. The paper towel paper works for stamped images and painted images. Scroll below to see a short overview of the process. I have also used this image on a journal in an earlier post, the brown leather-look journal posted last month.

I am currently in the middle of a bid war for a retired SU set Gentler Times, so I am off to wield my bid sword. Enjoy.....


Paper Towel Art
1. Place at least three colors of acrylic paint in plastic cups or bowls and add water to thin. The thinner consistency, the lighter the color will be when done.
2. Cover your work surface with newspaper and then freezer paper (plastic side up).
3. Fold a paper towel (I have found plain Viva works best) in half, then half again, then half again, then half again....keep folding until you have about a 2-inch square (you can fold the towel in any shape, experiment to your heart's content).
4. Dip one corner in one paint color, lightly squeeze excess back into cup. Dip next corner in another color, lightly squeeze excess back into cup. Dip the next corner into another color... keep going until the paper towel is covered with color. Allow the colors to bleed into each other. Only thing is, make sure the towel is completely covered.
5. Unfold the paper towel, working carefully not to tear the towel.
6. Lay the towel either on the freezer paper or on an old clean window screen to dry.
7. Once dried completely, some of the 2-ply towels will pull apart to make two sheets. If this does not work, just use it as one sheet.
8. Mix tacky glue and water (reminds me of thin ranch dressing).
9. At this point you need to decide if you want the towel to be one complete sheet or if you want to tear different sheets into smaller pieces to layer. If you are layering, you will need a sheet of white cardstock to layer the pieces on for stability. Put this cardstock on your freezer paper. If you want just one complete sheet, lay the paper towel on the plastic side of the freezer paper.
10. Paint the glue mix on the towel and cover the towel completely. I use a soft flat brush, the form brush will tear the towel. If you are using pieces, treat them as you would decoupage.
11. When covered, set aside to dry completely on the freezer paper.
12. Once dry, peel the sheet from the freezer paper. It is ready to be painted, stamped (with Staz-on) and written on. Some of my favorite pens are Sharpies, glitter markers and wite-out pens. The texture is ruff, so do not use your good pens. You can cut it to any size and glue it to anything.
13. For a leather look, stop after step 6. You will need to leave the towel whole 2-ply and all. I iron the sheet with a low temp iron using an over-cloth if needed. This flattens out the towel and it becomes softer, almost suede like. To use this for a journal or card, just cut to the desired size and glue it to your project. I use Yes! paste for this which has less water. Once glued, you can stamp and embellish. If you want to paint on it, you will need to spray seal it first with matte spray.

Please let me know if you have any questions.